How To Make A Rope Rug – A Simpler Way
I am going to go ahead and share with you How To Make A Rope Rug! Yay!! So I’ve seen a couple tutorials but I personally think their explanation is TERRIBLE. They look really nice, but they really aren’t user friendly for beginners. I’m pretty much a beginner, so if I can do it…you can too!!!
And I’ve been trying to take lots of pictures to show you what exactly I am doing 🙂 Also, the best motto ever I think is K.I.S.S. Keep It Simple Stupid!!
I think some of these other tutorials forget about the simplicity part. If there is an easier and simpler way to do something, do it!
Here we go!!
Materials!
1. You are going to need some kind of cording. The one I used for this particular rug is 1/4″ clothesline from Home-depot. I used 2 packets (each is 100ft long). This is fine and all, but attaching it is kind of annoying. And if you want it bigger, you will need MORE. If you live in Arizona, I would suggest going to Mesa Sales or Tempe Sales and get one of those huge rolls. The cording is a little different than the clothesline but still soft enough to go through your sewing machine.
2. A sewing machine!
3. A jean needle since you will be going through fabric and the rope or cording
4. A lot of strips of fabric 1″ wide and however long as you want to make them! Two feet is probably long enough. Anything too long might be annoying while you are wrapping the cording. (I bought maybe 4 yards of fabric and still haven’t even finished cutting it all up. I might not even need it all. You may need more if you want to make your rug SUPER big)
5. Matching tread or a contrasting color. Which ever you think will look the best (I would get the dual duty/all purpose thread) You may need to get at least 2 things of thread. Possibly more depending on how big you want it to be but it would stink if you ran out and had to go back to the store!!
Make sure it is tight!!
While wrapping, you are going to want to overlap the fabric about halfway, as you can see here. Once you finish that strip, just go ahead and place a pin in it to keep it in place. It will be easier to start the rug at this point, that way we dont have to worry about the tip! It also holds the rope in place which makes it easier for a tighter wrap.
So what I did when I started it (btw this is my very first rope rug!) I folded the tip about a centimeter and slipped it under my sewing machine foot. (
You are going to want to make sure the wrapped rope that you are attaching is on the right side like mine is shown in the photo above.)
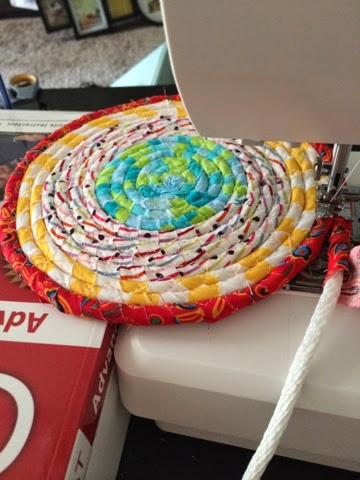
So when I began, I manually stitched it a couple times until it started making a nice circle. I did it this way because it was MUCH easier to control it. Once the coils are formed, you don’t have to do it manually anymore because that would take FOREVER!! While you are sewing, you want to have the center of the foot to be aligned with where the already coiled rope meets with the soon to be sewed rope. You can kind of see in the photo below. See the little lines that are RED on the press foot?? You can see how I lined it up. This is because we want the three zigzag stitch to be centered so it centered so it latches onto both of the ropes. You can see what I mean and what it should look like completed with the blue and green fabric in the left of the photo.
Once you get it started a little bit, go ahead and wrap your little heart out!! Since sewing is SO much faster than wrapping, I would suggest wrapping as much as you can before you sew. Pop in a movie or something! That’s what I did. Just make sure you put a pin at the end to keep it from unraveling.

It will just start getting bigger and bigger!
Just a heads up, as you are sewing, make sure you do NOT pull on the rope you are feeding to be sewed tight. This will more than likely cause the rope rug to slowly turn into a bowl. If you want a bowl, thats great! but if you want a rug, you need to keep it flat. Try keeping it tight…I just had one hand on the rug and my other hand on the right of the rug, helping it feed and making sure the part where they are connecting is in the middle.
Basically you keep doing this over and over again until the rug is as big as you want it to be. To be honest, I still haven’t finished mine.
When your rug starts to get bigger, you are going to want to keep your rug as flat as possible to keep it from warping! I put some books next to my machine to keep my sewing space level. I would check out the photos they have on here. It’s a fabulous blog!! They have the cutest crafts and pictures! However, I would suggest ignoring the steps to make their rug. To many steps and half of them are a waste of time and will probably cause more frustration than anything else. (my opinion anyway...)
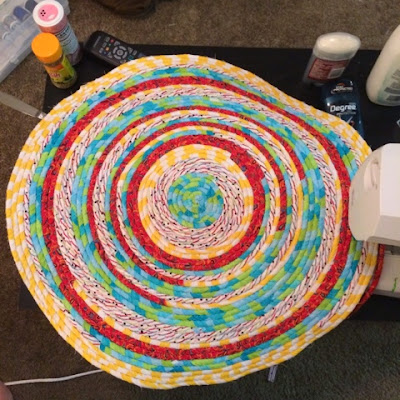
This is as big as I have it right now (See below)…It would be bigger but I did get a chance to work on it at all yesterday!! I also did all of that in an afternoon! 🙂
Finishing: When you finish, wrap all the way to the end and then wrap it back the other way. At least that’s what I did and I folded it in so it was as neat as I could make it.
I’m making this for my kitchen in the soon to be new apartment! Or whenever else I decide to put it.. Pictures will be posted once we move!
I hope you enjoyed this tutorial! And if you need more clarifications or if you have any questions or need me to explain something a little bit better, please ask away! Leave questions in the comment section and I will reply as soon as I can.
Enjoy!

Cheers!