Movie Night Pajamas SewAlong: Day 1 – Prep Day
SEW ALONG OUTLINE
Welcome to Day 1 of the Movie Night Pajamas SewAlong! I am so glad you have decided to join us this week! If you are just tuning in, use the links above to jump to the different pages. The “welcome” post will fill you in on lots of details before you get started.
Today is an important day, especially if you need to grade your pattern or if it needs to be shortened or lengthened. If you are new to sewing and need a little help measuring, check out the video below! The women’s movie nights are drafted for a B cup. Upper Bust is not on the size chart, but if your UB is more than 3” larger than your full bust, you may need a full bust adjustment for optimal fit.
PRINTING YOUR PATTERN
If you don’t have Adobe Reader, you can download it for free HERE. Once you open the pattern in Adobe, when you print, make sure it is selected to 100% or actual size and auto portrait/landscape. Keep in mind the pattern is a TRIM PATTERN, which means you will need to trim the pages before taping together. I find it helpful to trim the bottom and right side of each page and then overlap to match up the triangles, instead of trimming the whole thing and butting the pages to each other. SALS patterns are TRIM because the document can be printed on both US Letter or A4.
You can print the pattern so it’s “no trim” by printing it in “portrait” instead of “auto portrait/landscape”. This will put the document image in the top left corner. The main issue with this is part of the document getting cut off because of the printer margarin (1/8-1/4” around the edge of the paper where the printer doesn’t print), so keep this in mind if you print this way. You would just overlap the pages so the edge of one page meets up with the line/image border on the other page.
If you have not printed a PDF pattern before, only print the page with the TEST SQUARE and make sure it is printing at the correct scale. Even if the square is off by just a small amount, it will cause big problems. For instance, if the square is too big by 1/8”, that means every 8”, the pattern will have gained an extra inch in every direction. On a pair of pants, that’s a lot of extra inches! You will avoid wasting a lot less paper if you only print that one page and make sure it’s printing correctly before printing the rest.
GRADING
Measure, measure, measure! This is so important. Your RTW (ready to wear) sizing does not apply when it comes to sewing. Rarely will you fall perfectly within a specific size across multiple designers and patterns. This means you more than likely will need to grade your pattern. (I usually always have to grade out my waist since I’m more of a rectangle shape) You essentially will draw lines connecting the size of your bust, waist and hips. Since I grade out my waist, I end up taking out any waist curves to my pattern pieces. If I skipped this, my finished garment would be a lot more snug in the waist than it was drafted to be. (If you still aren’t sure on the sizing, grab a fitted top and compare it to your size on the chart.)
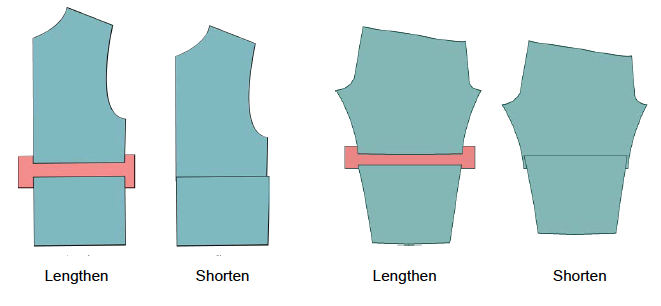
Once you have your measurements taken (see video below if you need help), if you fall under multiple sizes, use the LAYERS function on Adobe Reader to select only those sizes before you print your pattern. This will make grading easier. If you need to lengthen or shorten your pattern, make sure you do it in the middle and not at the bottom hem line.
To lengthen, get a blank piece of paper and some tape. Cut your pattern in half. With your blank piece underneath, spread your pattern apart as much as needed for your height (check the finished measurement chart!), making sure to keep the “fold” edge straight. Tape the pattern to the blank piece of paper and connect the lines. Repeat for the back. Depending on how much length is needed, you may need to add some in the body as well as the armscye. If you adjust the armscye, you will also need to adjust the top of the sleeve.
To shorten, you will do the same sort of thing, cut your pattern but overlap the pages, tape together and trim any uneven edges.
If you need to lengthen/shorten the pants significantly, I’d suggest splitting it up in a few places: i.e above the knee and below the knee.
If you need any additional help with grading or shortening/lengthening your pattern, post your questions in the comments or on the Day 1 thread on FB. Though it does take a bit of extra time to adjust your pattern pieces to fit your body, it’s totally worth it and will help with the best fit. Don’t get lazy! You only have to do it once!
Make sure you also have any other pertinent supplies needed for the sew along; like elastic, buttons, matching thread, pins/clips, seam ripper (just in case!), interfacing, etc. Tomorrow I will have a video up on how to determine your fabrics’ stretch. Stay tuned!
Videos


You May Also Like
Upcycler avec SALS – Jour 3
July 14, 2021
Ollie Bomber Jacket SewAlong: Day 4 – Attach Lining, Finish Lined Version
September 12, 2019
6 Comments
Katie Okoro
Hi, Newbie. Where do I find the pattern to print?
Trissa Marie
Quick links to all of the different Movie Night PJ patterns are found in the "Welcome" post! 🙂
Carol
Thank you ?
Trissa Marie
You are most welcome! Glad you are joining in on the fun!
Katie
Thank you for the code! I have downloaded the pattern successfully and will me joining in.
Trissa Marie
Awesome! And you are most welcome! Can’t wait to see what you make! <3