Movie Night Pajamas SewAlong: Day 3 – Shoulders, Neck, Sleeves
SEW ALONG OUTLINE
Welcome to Day 3 of the Movie Night Pajamas Sew Along! Today we start sewing! You should have your fabric all cut and ready to go. We won’t be touching our pants until Day 5, so go ahead and set those aside for right now. Today we will be sewing up the neckline and adding sleeves, so whether you are doing a regular neckband or a placket, that will be completed today. Videos for today are at the end!
SEWING WITH KNITS
NEEDLES
Before you get sewing, you want to make sure you have the proper needles in your machine to work with knit fabric. The most common needles for knit fabrics are a Ballpoint Needle or a Stretch Needle. A ballpoint/jersey needle is rounded, so that it slips between the knits and purls of knit fabric. You can use this on any type of knit fabric, but it is recommended to use a stretch needle for fabrics with Lycra/spandex. A stretch needle is rounded like a ball point, but also has a sharp point like the universal. The rounded shape makes it slip through this knits and purls, and the sharp point goes through the spandex more easily, giving you better stitch formation. Beware of universal needles. It is meant for woven fabric even though it’s called “universal”. If you are having any issues, such as skipped stitches, poor stitch formation, thread breaking, thread snagging, etc., the first things you should try is rethreading your machine, both the bobbin and the main thread. If that doesn’t fix your problem – change your needle. It’s crazy how many issues are fixed just by changing your needle! If a new needle fixes your problem, just go ahead and throw the old needle out. Another needle that is convenient but not necessary is a double needle, which is used for hemming knit fabrics, similar to a coverstitch.
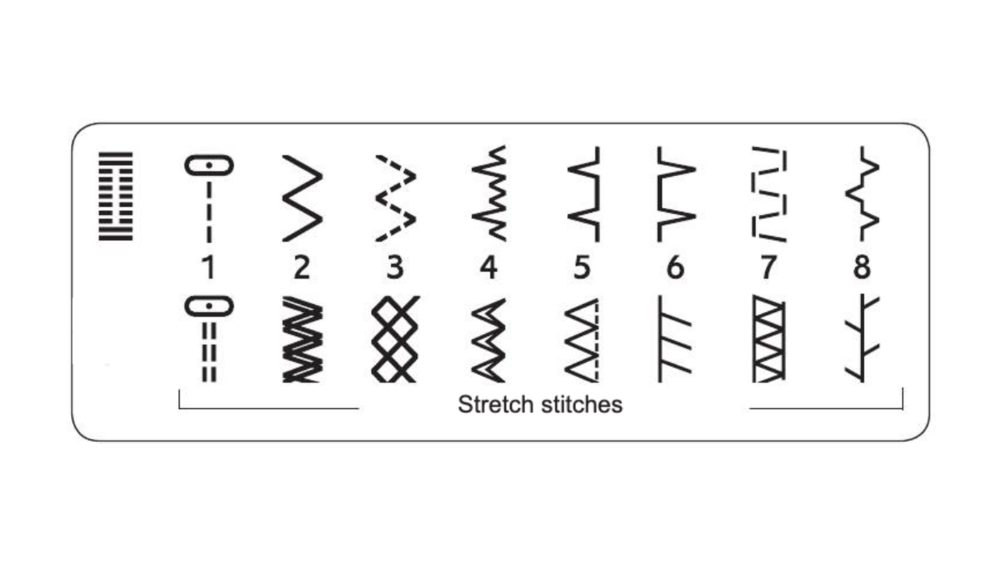
SEWING MACHINE STRETCH STITCHES
If you are new to sewing or new to sewing knits, you probably are sewing on a sewing machine, so let’s talk about stretch stitches. All sewing machines have multiple stretch stitches. Some are good for garment construction and some are good for hemming or topstitching. The best way to determine which ones are specifically for knits, or stretch fabric, is to look at your machines manual. If you don’t have a physical copy, just about every machine manual should be available to view online for free.
All of the basic sewing machines I have used has the stretch stitched on the bottom, under each stitch number. This doesn’t really apply for those of you who have a gazillion stitches on your machine. These are the stitches my machine has and the bottom 8 are all stretch stitches, used for different purposes. When I first started sewing, before I got my serger, my prefered stitch was stitch 6. Make sure you sew on a test piece of fabric first to make sure your tension and stitch length are correct for your fabric.
If you notice that your fabric is stretching out while you are sewing, you may want to try a walking foot for your machine. A walking foot is an accessory with built-in feed dogs to guide two or more layers of fabric through your sewing machine and helps keep your fabric from shifting while sewing
STITCH 1: REINFORCED STRAIGHT STITCH, AKA THE TRIPLE STRAIGHT STITCH
Triple and elastic, for reinforced seams. For topstitching, increase the stitch length.
STITCH 2: REINFORCED ZIGZAG
For joining fabric edge to edge or overlapping in leather – decorative sewing.
STITCH 3 & 7: HEIRLOOM STITCHES
For hemstitching, smocking and sewing on lace and trims
STITCH 4: 4-WAY STITCH
For directional sewing and patching using a free arm
STITCH 6: STRETCH SEAM OVERCAST STITCH
Seam and overcast in one step along the edge or trim later. For medium and medium/heavy stretch fabrics.
STITCH 8: QUILTING STITCH
BASIC TROUBLESHOOTING
The needle thread breaks
Needle thread not threaded properly
Needle tension is too tight
Needle is bent
Needle is incorrectly inserted
The bobbin thread breaks
Bobbin thread not threaded properly
Lint build up in the bobbin case
Bobbin is damaged and does not turn smoothly
Skipped Stitches
Needle thread not threaded properly
A poor quality needle is used – replace needle
Needle thread tension is too tight
DAILY TASK
Once you have your stitches figured out on your machine, lets get sewing! Today we are tackling the neckline and attaching the sleeves to the bodice. Once you attach your neckband, you can topstitch the seam down with a coverstitch, double needle, zigzag or straight stitch. I find that this helps the neckline lay flat and it tends to look a lot neater.
VIDEOS


You May Also Like
Upcycling with SALS – Day 4 – Avery Apron with Scraps
July 15, 2021
Grady Sew Along – Day 4 – Back Construction
September 24, 2020